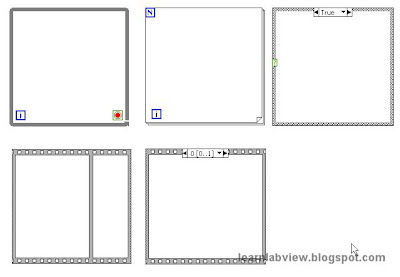
 Here is what they do:
While loop - The top left structure should be familiar now. It is a while loop. The block diagram in the structure executes while FALSE is received by the stop icon and will stop when it receives TRUE. The 'i' terminal puts out the iteration number each time the while loop iterates.
For loop - To the right of the while loop is the for loop. This is a similar structure to the while loop, except that the internal block diagram has no control over the loop (notice there is no stop icon). Instead the number of iterations to run is decided external to the structure by wiring to the 'N' terminal at the upper left corner. 'i' does the same thing as the while loop.
Case - To the right of the for loop is the case structure. You can wire any type of data into the left '?' terminal and possible values appear at the top center. You can page through those values by clicking the arrows, and through the right click menu delete and add potential values (also called cases). The case structure has many alternate block diagrams and only one is selected for execution depending on the value that arrives at the '?' terminal. If you place code in the case structure, then page to a different value possibility, you will notice the code disappears, that is because you're drawing a different block diagram for each possible case. One final note with the case - if you wire an output tunnel, you must wire to the tunnel from all cases so there is always a value available for your code to use after the case structure executes. This structure will take some time to get used to, but it is an absolute necessity in forming useful logic in LabView programs.
Sequence - The bottom row of the common structures shows two different types of sequence structures. The left version is the "flat" sequence and the right version is the "stacked" sequence. As you become more advanced at LabView programming you will find yourself using sequences less and less, but in the beginning you will probably use them frequently. With both versions of the sequence, there are multiple block diagram subsets represented, but without any dataflow order enforced, the first piece will execute to completion before going to the second piece. In the flat sequence you can see all the pieces on the block diagram at once. With the stacked sequence, you page to each piece in order much like the different possibilities in the case structure. The difference from the case structure is that all the pieces will execute in order. With the sequences, you can right click on the border and select options in the menu to add "frames" which provide another piece of block diagram to add code.
There are other structure types, but you may not need them immediately. Feel free to investigate those independently because you probably know enough about LabView at this point to learn about those on your own.
4 comments:
In your discussion of the while loop, don't you mean that it runs until "true," not "false?" I'm a little confused.
Thank you for these tutorials! Please, keep them coming!!!
You are absolutely right. Thank you for pointing that out. I will correct it right away.
You can actually choose in LabView to make the while loop run until false, and the stop icon will change to a circular arrow icon. This requires setting an option in a right-click menu.
It was really a great experience going through this material. I would be glad if you try to give some examples of using the other loops too as you did for the while loop.
Regards....
Post a Comment