In LabView, you set up an array control or indicator by first navigating to the "Array, Matrix & Cluster" menu and selecting "Array", as shown below:

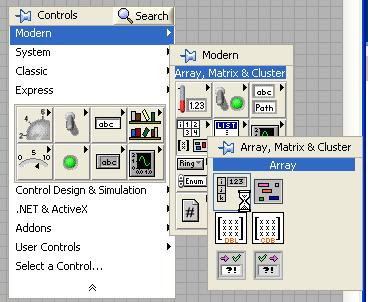
Once this is selected, you will drop something on the front panel that looks like this:
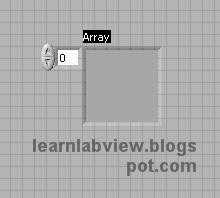

This is an empty "Array Container" meaning that right now it is an invalid control. You must place another control inside it to make it valid. Your LabView VI will be broken (You will see the broken run arrow) until this is done. Let's do an example:
First, place a numeric control near the empty array container:
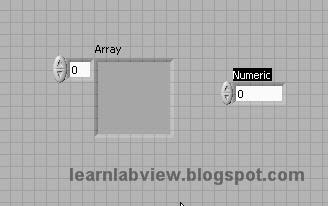

Next, drag the numeric control into the array container and that is it. You have created an array and the type of the array is the same as the control you dragged into it (numeric). The valid array looks like this:

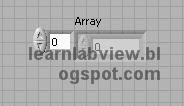
Now, if you hover around the outside boundary of the array container (not the control inside) some dots will appear like the following:
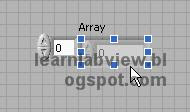
 If you hover over the bottom middle dot, and drag it down, you will expand the number of "elements" visible in the array:
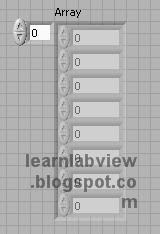
 Each replica of a numeric control is an element. You can type different values in each one. There are actually as many elements as you want there to be, without them needing to be visible. The small numeric control at the upper left is the "Array Index" which specifies the number of the element shown at the top. Think of it as a being similar to a scroll bar on a window. It allows you to move through all the array elements if there are more elements than there are elements shown on the front panel control.
The above array actually has no elements right now. All the slots for elements are greyed out. If you click in a control and type a number, then the array will be expanded to contain elements.
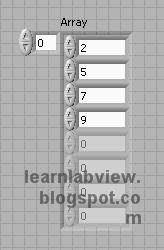
 Above is an example of the array control with 4 elements. These were added manually by clicking in each of the boxes and typing in the numbers. Try clicking the array index increment or typing 1. You will see that the array control scrolls and you can no longer see array element 0.
In LabView code there are a few different ways of making use of arrays. The first is the array index function, and the second is the array autoindex tunnel.
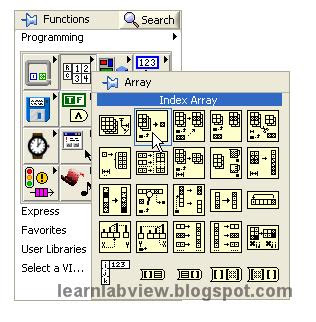
 The above menu screen shows where the array index function is located on the block diagram menu and what it looks like. Place it and wire it to the terminal of the array control to create the following VI:
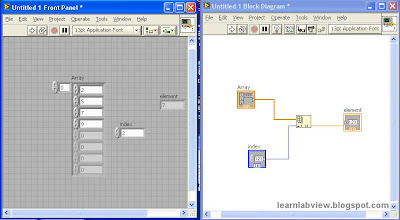
The Array Index Function has the array and index inputs on the left and the element output on the right. The number wired to the index input selects one element from the array and sends it to the element output. A few extra controls were added to the VI and wired to create this example. Run it and change the array and index inputs. You will see that you are selecting one item from the list. Complex programs work with large sets of data and have logic to select pieces of data. This example shows one of the building blocks by which this may be done.
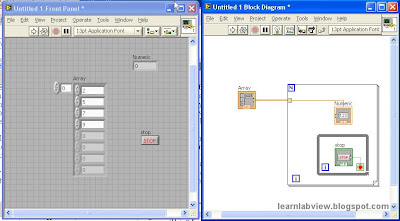
If you would like to repeat an operation and do something with every element, then perhaps the best way to do this in LabView is with an array autoindexing tunnel. When you wire an array to a for loop, you get one automatically. It has a different appearance than a typical tunnel for single values. The 'n' terminal for the for loop does not need to be wired. Instead the for loop will automatically run once for each element in the array and the tunnel will pass only a single value rather than the entire array. Each iteration of the for loop will go to the next index of the array.
Here is an example showing the same array control wired to a for loop. Note the autoindexing tunnel's appearance. It is not filled in, and has ' [ ] ' inside it. The wire of an array is also thicker in appearance than the wire for a single value. Once you are familiar with these conventions they will help you to quickly understand any block diagram using arrays. The nested while loop has a control that stops it. This allows the program to run one iteration and stay in the while loop until the stop button on the front panel is manually pressed.
This will demonstrate autoindexing. The VI will run until each element has been displayed. Press the STOP button to go to the next element by allowing the next element to be automatically indexed from the tunnel on the next iteration of the for loop. The for loop knows how many elements are in the array and will halt once every element has been processed.
 This gives you an introduction to arrays. Try dragging controls in and out of array containers, resizing the array controls, scrolling the array index on the front panel, entering values in the array, and right clicking on elements and the outside boundary of the array container to see the different context menu options that appear. These are all ways to learn about the power of arrays in LabView.
5 comments:
can i link your blog at my blog list.i also interested in LabView programming.
www.komoeyay.blogspot.com
LabVIEW software is ideal for any measurement or control system, and the heart of the NI design platform.
Integrating all the tools that engineers and scientists need to build a wide range of applications in dramatically less time,
LabVIEW is a development environment for problem solving, accelerated productivity, and continual innovation
labview programming
I appreciate you taking the time to correct some of my misconceptions and provide a different perspective.
I will admit that LabVIEW does have some awesome hardware integration and definitely eases deployment.
My post was mainly a outlet for too many hours of frustration trying to get LabVIEW to do things that
I could have accomplished in much less time using a more traditional language.
And while I still prefer text-based languages
labview programming
Arrays are essential for efficient data handling and manipulation within LabVIEW.
Post a Comment